Interface of laboratory work
Access to the web interface for remote control of laboratory works is performed using most modern web browsers (Chrome, Opera, Firefox, etc.).
«Home» tab:
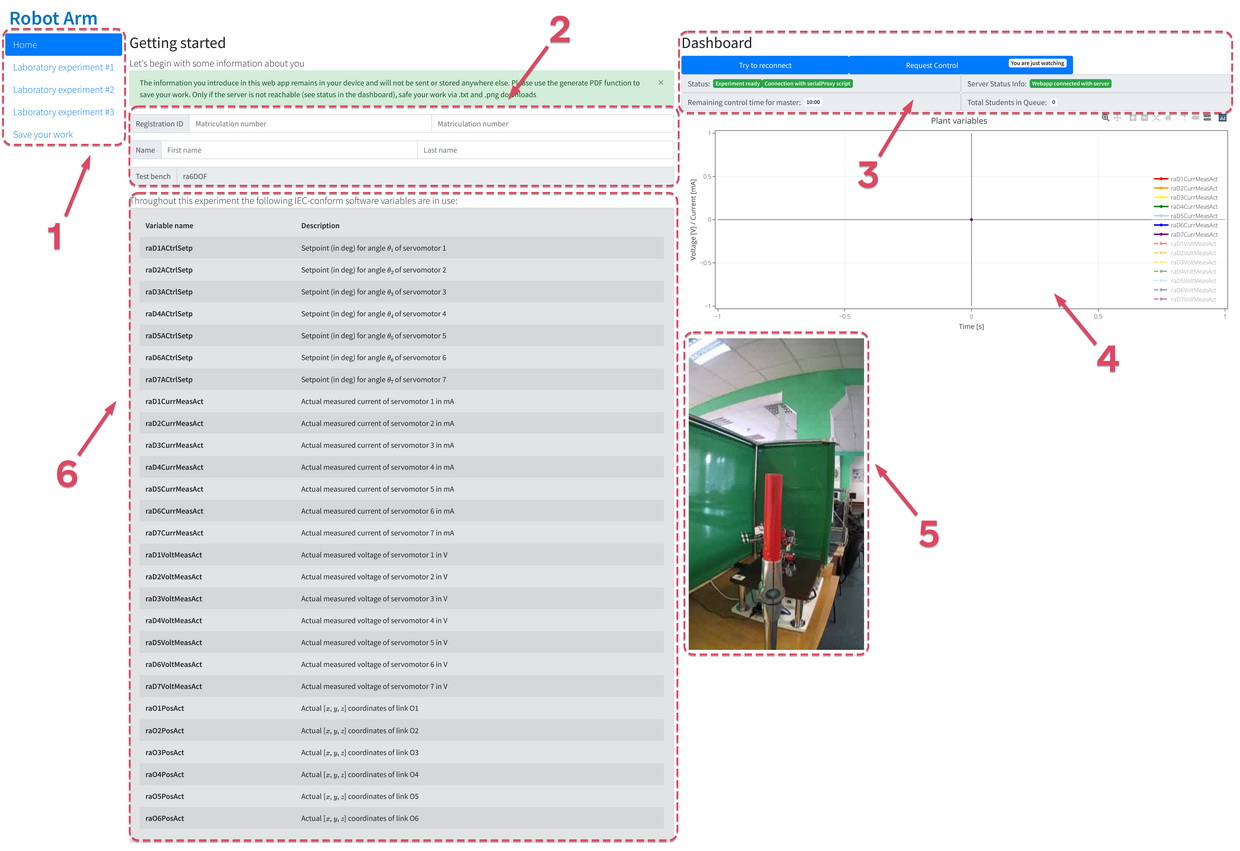
To perform a cycle of laboratory robots, you should first go to the link to the "Robot Arm" web interface. Using the "Request Control" button of the "Dashboard" panel (Fig. 11, item 3), enter the three-digit access code that the teacher will provide. After a successful connection, you should enter your personal data in the "Getting started" field (Fig. 11, item 2). The entered data is used only to generate an automatic report and is not stored on the server or in any other form. To successfully generate a report, you should make sure that you have disabled all ad blocking tools (Adblock, uBlock, built-in browser tools, etc.). After filling in the data, you can go to the "Laboratory experiment #1" tab using the panel (Fig. 11, item 1).
You can also find the following tools on the "Home" tab:
- window for viewing "Plant variables" graphs (Fig. 11, item 4);
- he list of variables displayed on the graph (Fig. 11, item 6);
- a window for viewing video in real time from an IP camera (Fig. 11, item 5).
«Laboratory experiment #1» tab:
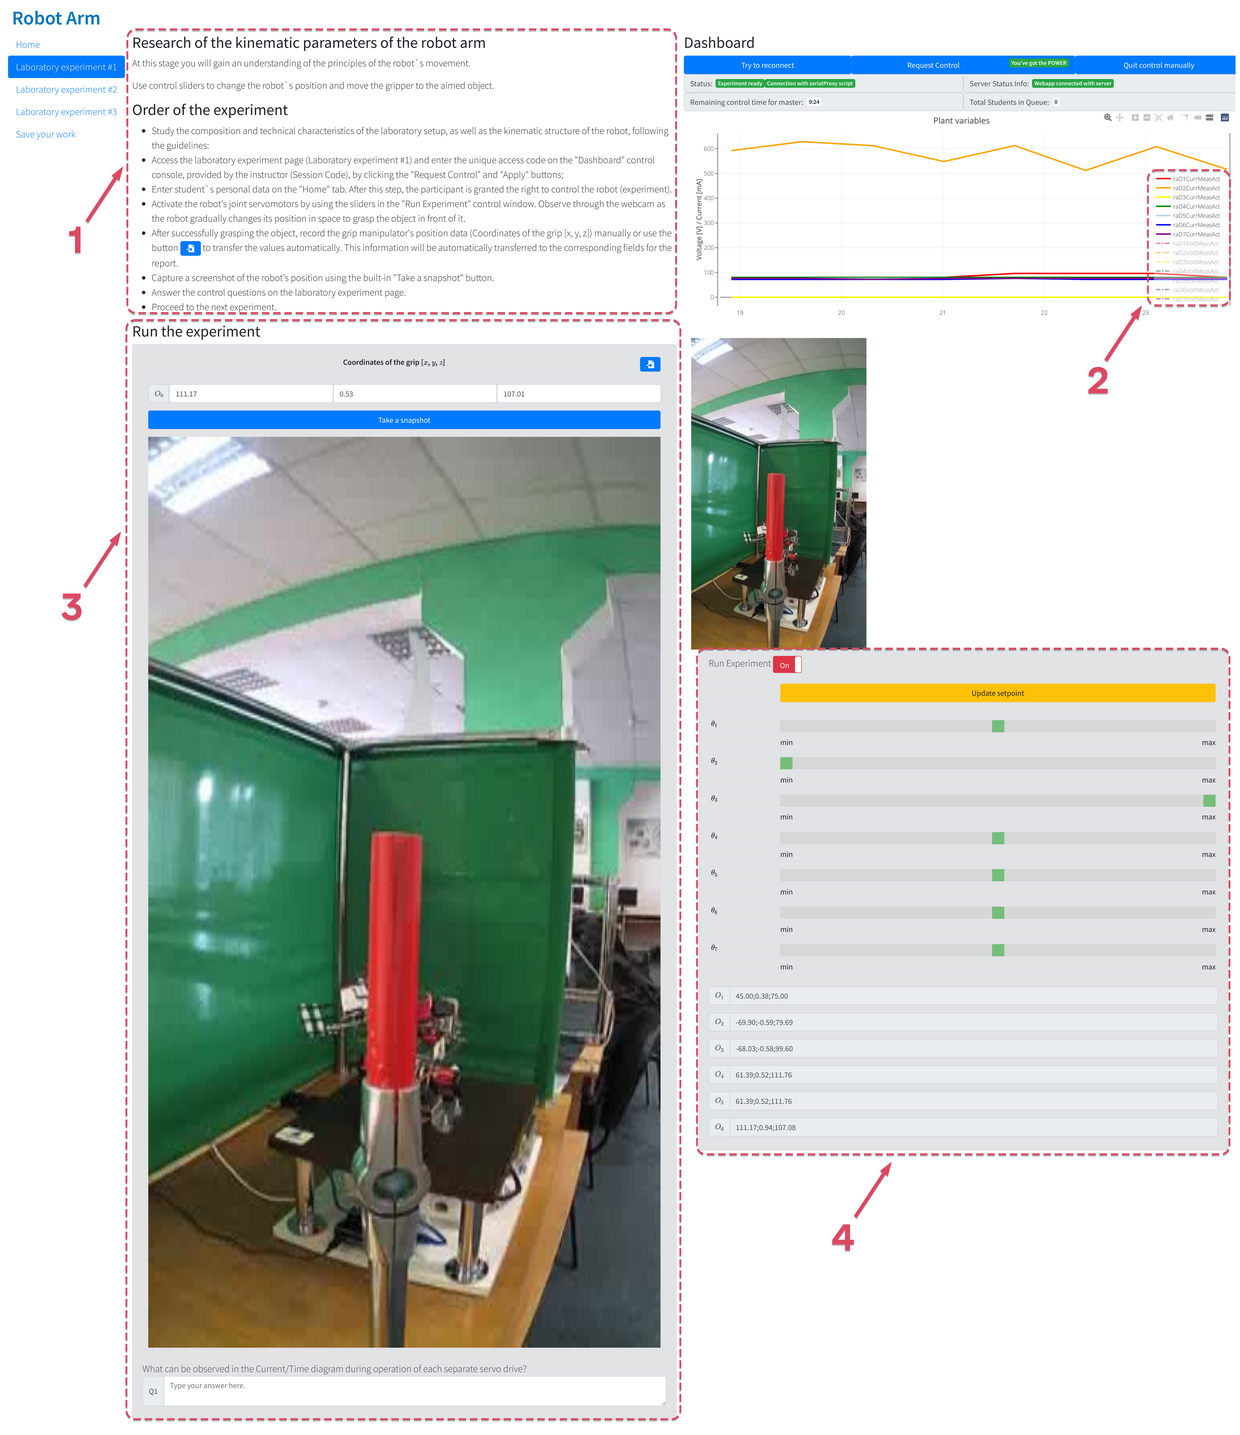
The "Laboratory experiment #1" tab is intended for performing the first laboratory work, which is devoted to the study of the design, parameters and kinematic scheme of the 6DoIt Mobile Robot Arm (6DMRA).
The tab contains the following interface elements:
- Algorithm for performing laboratory work "Order of the experiment" (Fig. 12, item 1).
- The window for recording the results of laboratory work (Fig. 12 item 3).
- Control panel of the robot "Run the experiment" (Fig. 12 item 4).
The main goal of performing laboratory work is to reach the object in front of the robot (red rod) with the grip. By including the servomotors of the robot links in operation, using the object control panel (Fig. 12, item 4), which contains the following elements: sliders for changing the angle of rotation of each individual servomotor М1-М7 \((θ_1 - θ_7)\), coordinate output field x,y,z \((O_1 - O_6)\), stand control permission switch (Run Experiment), robot position update button (Update setpoint).
You should gradually change the position of the robot in space and monitor the changes using the video viewing window coming from the IP camera in real time.
After reaching the object with the grip, it is necessary:
- Write down the position data of the grip of the manipulator in field \(O_1\) («Coordinates of the grip [x, y, z]»).
- Automatically create a screenshot of the position using the "Take a snapshot" button.
- Answer the control question.
The entered data and the screenshot will be transferred to the final report, which is generated automatically during the laboratory work. After achieving the goal, you should go to the next tab - "Laboratory experiment #2".
«Laboratory experiment #2» tab:
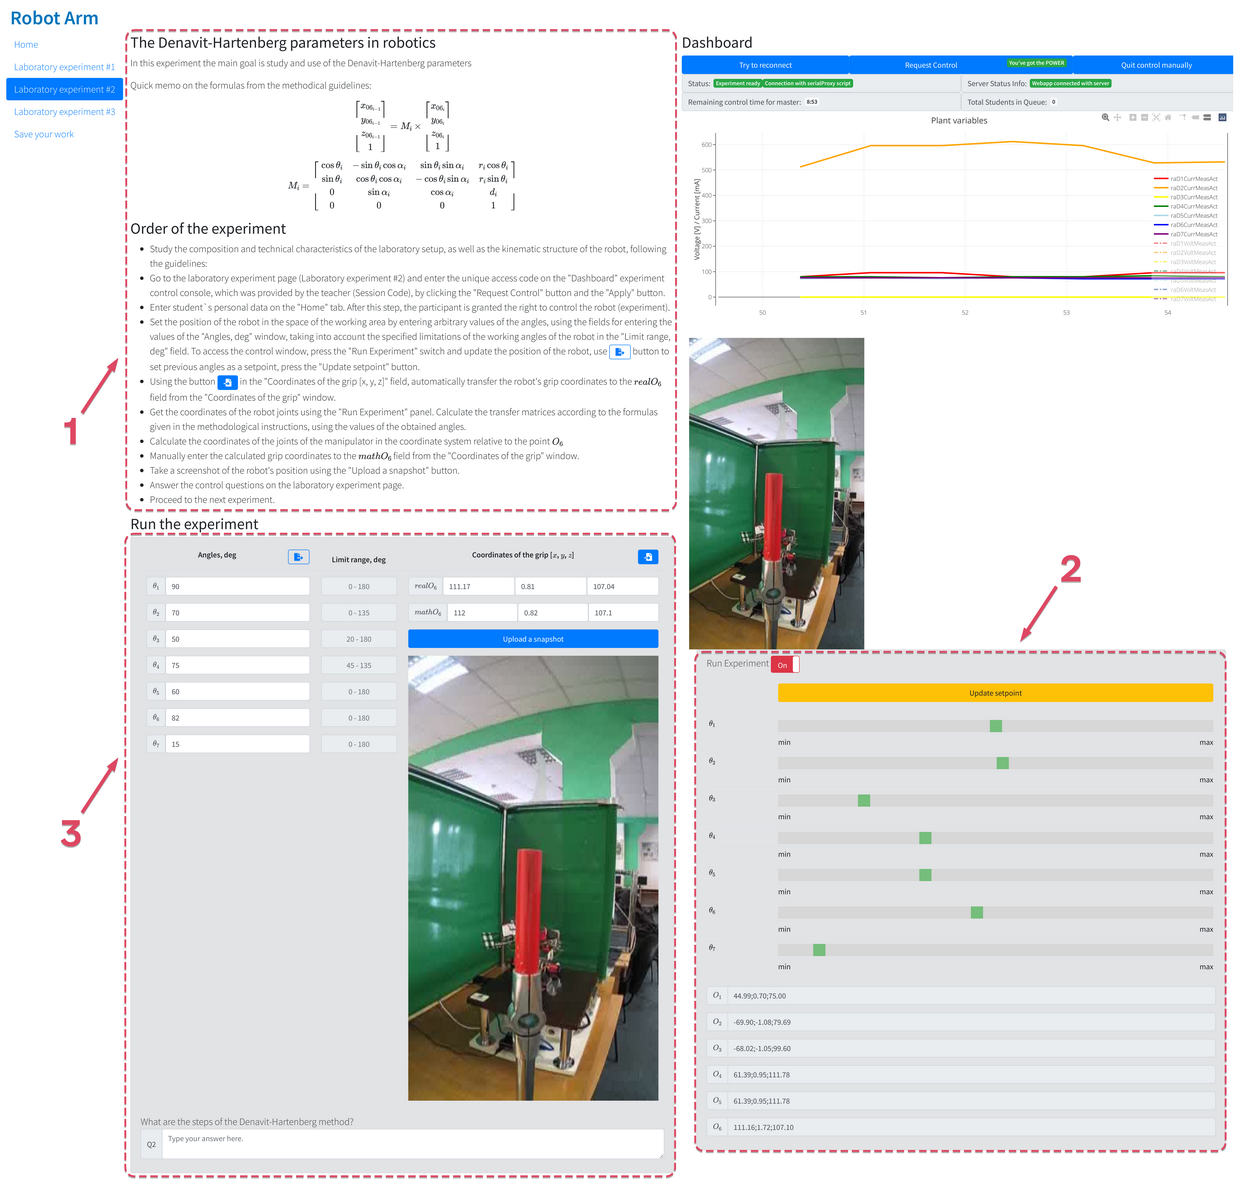
The «Laboratory experiment #2» tab is intended for the second laboratory work, which is devoted to the kinematic analysis of the 6DoIt Mobile Robot Arm (6DMRA).
The tab contains the following interface elements:
- Algorithm for performing laboratory work "Order of the experiment" (Fig. 13 item 1).
- The combined window of control and fixation of the results of the laboratory work (Fig. 13 item 3).
- Control panel of the robot "Run the experiment" (Fig. 13 item 2).
The main goal of this laboratory work is to solve the direct problem of kinematics using the Denavit-Hartenberg method. A detailed algorithm for performing laboratory work is given in the methodical instructions.
After successfully achieving the goal of the laboratory work, as well as filling in all the answer fields, you should go to the next tab - "Laboratory experiment #3"..
«Laboratory experiment #3» tab:
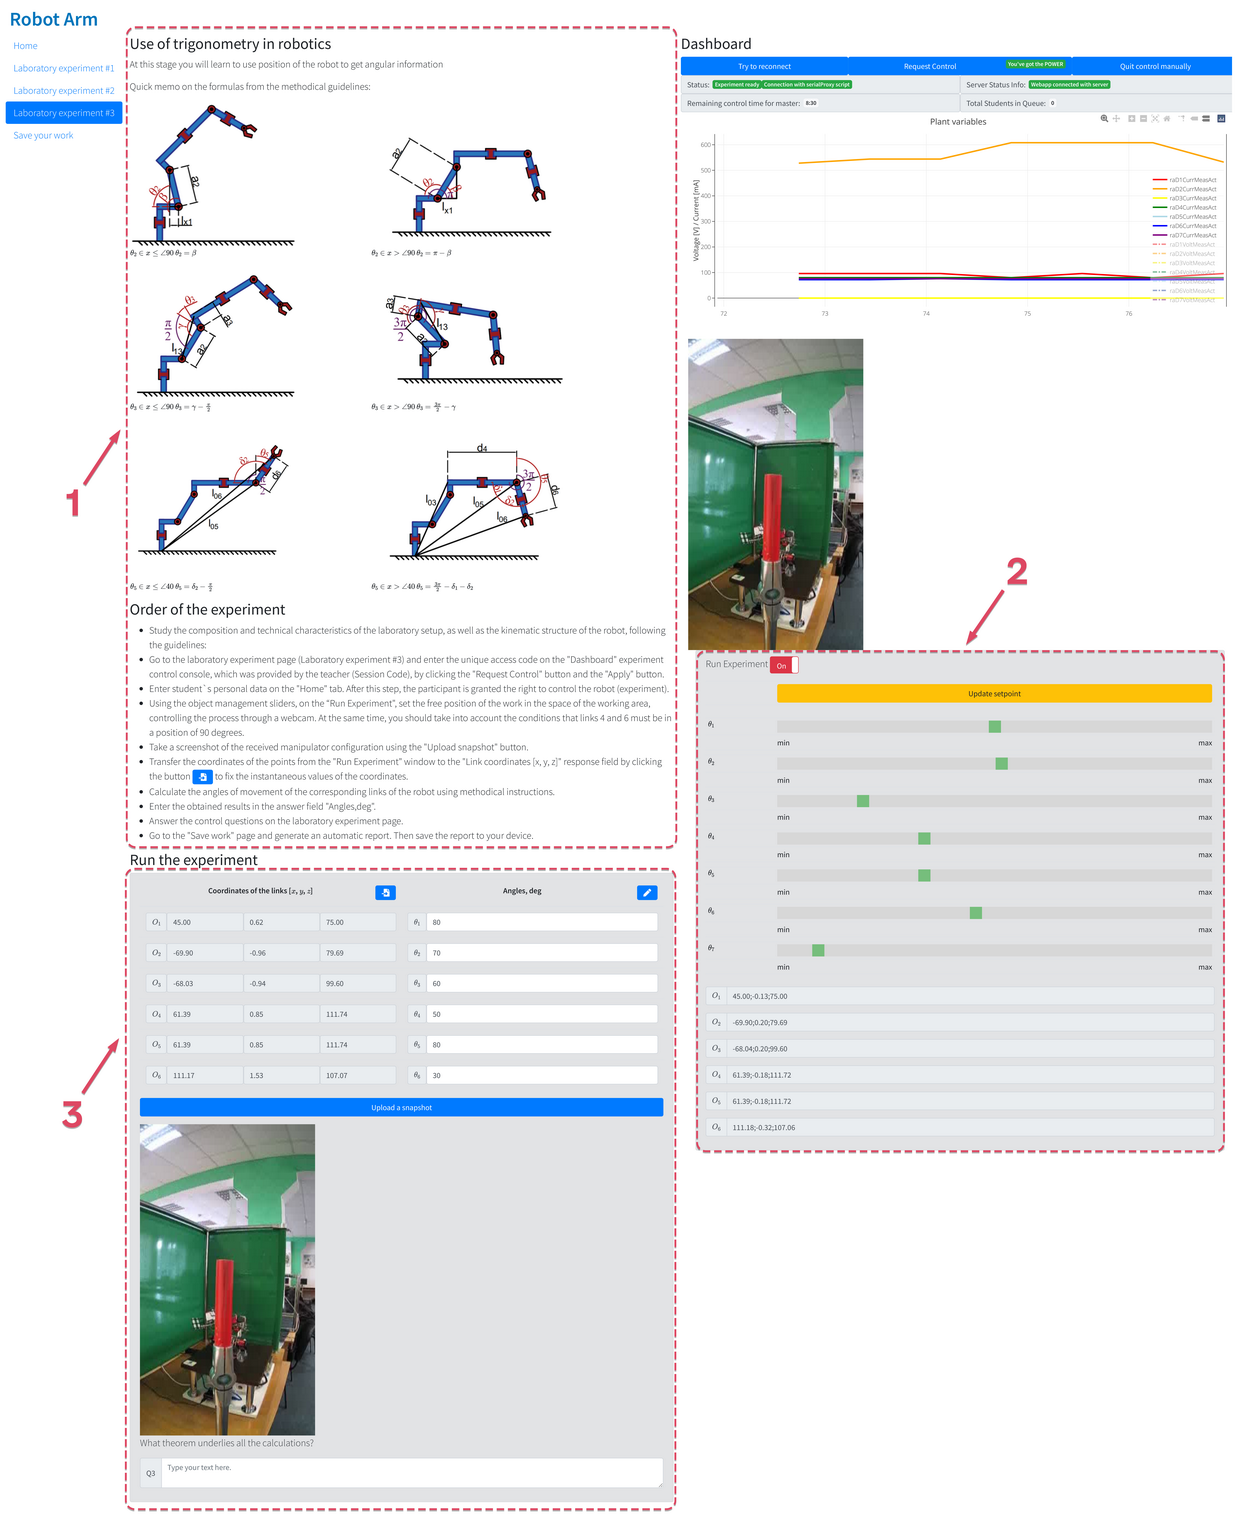
The «Laboratory experiment #3» tab is designed to perform the third laboratory work, which is devoted to the kinematic analysis of DMRA in order to solve the inverse problem of kinematics.
The tab contains the following interface elements:
- Algorithm for performing laboratory work "Order of the experiment" (Fig. 14 item 1).
- The combined window of control and recording of the results of the laboratory work (Fig. 14 item 3).
- Control panel of the robot "Run the experiment" (Fig. 14 item 2).
The main goal of this laboratory work is to solve the inverse problem of kinematics using the Denavit-Hartenberg method.
A detailed algorithm for performing laboratory work is given in the methodical instructions.
After successfully performing the experiment and filling in all the answer fields, you should go to the "Save your work" tab.
«Save your work» tab:
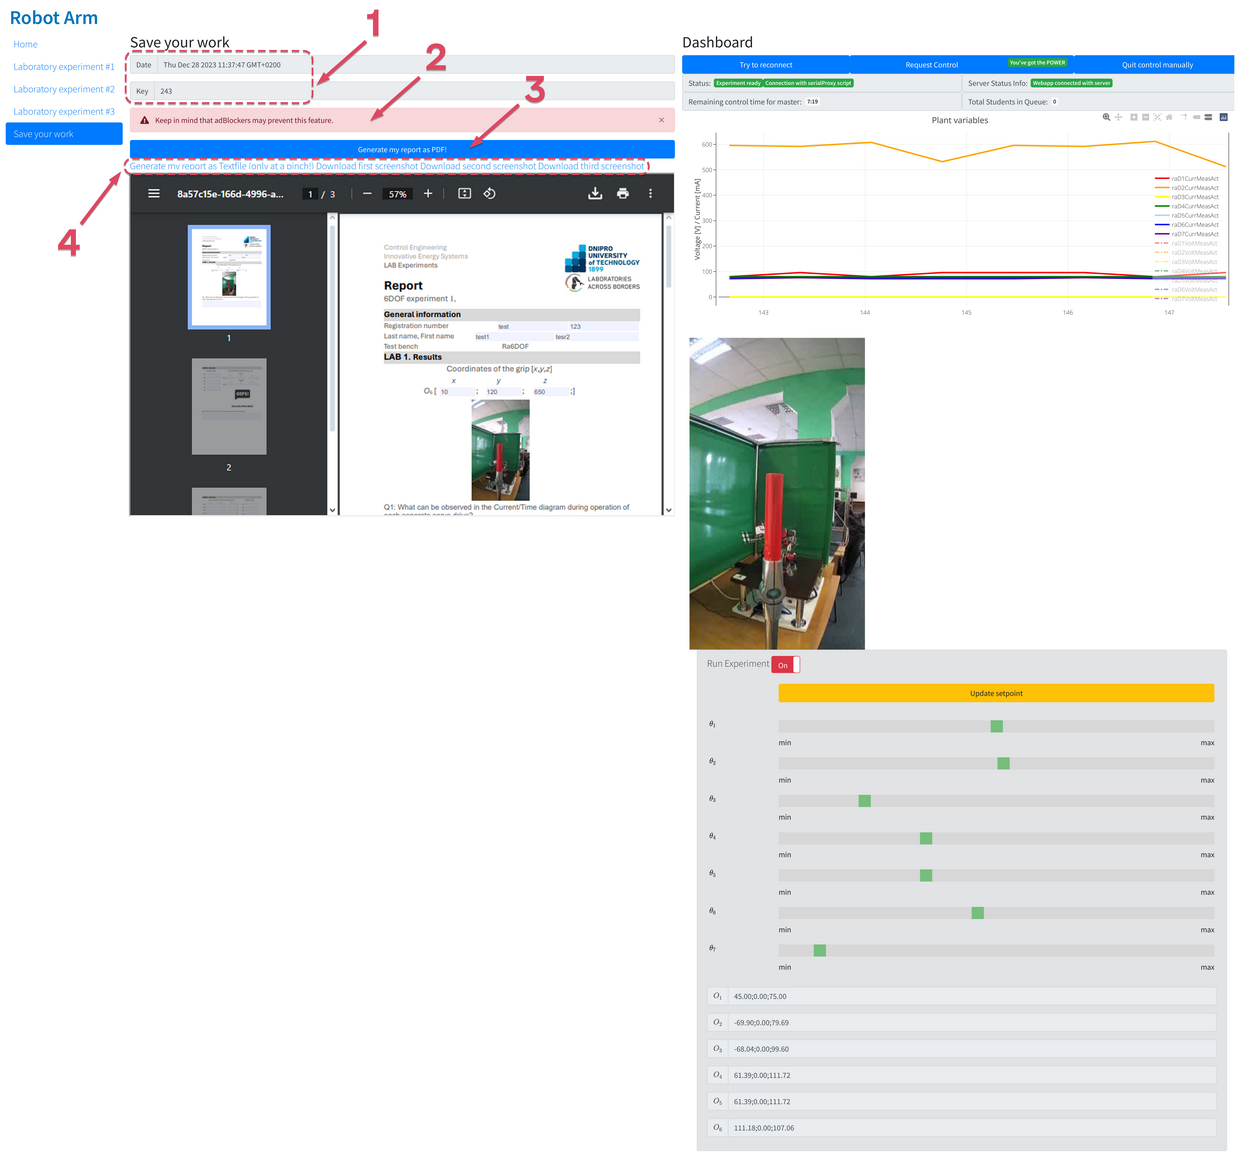
To generate a report, click on the button "Generate my report as PDF!" (Fig. 15, item 3). The final report records the date, time, and the user's access code (Fig. 15, item 1).
It is necessary to pay attention to the warning (Fig. 15, item 2) regarding the need to disable all software tools that are intended for automatic blocking of advertisements. In the event of a failure of the report generation system, the system provides protection in the form of the ability to download all entered data in .txt format, as well as screenshots from the camera showing the position of the robot (Fig. 15, item 4).
After creating the report - you should send it to your teacher to get a good grade!
